What is the fastest way to read values from and write values to an Excel worksheet with VBA? And how much faster is it?
 The most common and most effective recommendations to speed up slowly running VBA code in Excel are the following four:
1. Turn off the screen updating while the code is running
2. Set Excel’s calculation mode to manual while the code is running
3. Don’t select (activate) objects (ranges, charts, shapes, etc.)
4. Optimize the way of reading values from and writing values to the worksheet. Instead of looping through a range, read or write the entire block of data in one go with one single statement.
Well, you have seen those before, right? Nothing new under the sun.
However, how much can you speed up your code with these best practices?
Well, for the screen updating and the calculation mode, it depends on how your specific workbook looks like. The more complex the display is (i.e. how much rendering Excel has to do to update the screen?) and the more and more complicated formulas you have in your workbook (i.e. how long does one recalculation take?), the higher the performance gain will be. Thus, it is hard to provide universally valid numbers on the potential performance increase.
With regards to the avoidance of Select statements and the method of transferring data between Excel and VBA, however, a more or less generic test environment is possible.
Today’s post provides a small Performance Test Tool to demonstrate how much faster your VBA code can be, if you are using the best method to read data from or write data to an Excel worksheet using VBA. As always, the article comes with the Excel workbook for free download.
6 Methods to read values from and write values to a worksheet
We will compare 6 different approaches how to read data from and write data to a worksheet range by VBA. This section will only briefly describe the methods. If you are interested in the according VBA code, please download the Performance Test Tool (download link at the end of the post) and have a look.
Method 1 – Cell by Cell using Select
The first method does what you definitely should not do: it loops through the entire range row by row and column by column, selects a cell and then reads the value of this cell respectively writes a value to this cell on the worksheet. The code uses the .Select method and the .Selection object.
Method 2 – Cell by Cell (no select and no range variables)
The second approach gets rid of the (unnecessary) Select statement. Instead of .Select and .Selection, the code uses a Range object and its .Value property. However, the code still loops through the entire range cell by cell.
Method 3 – Cell by Cell (range variables)
Methods 3 is pretty much the same as method 2, but it defines and uses a range variable to address the cells on the worksheet.
Method 4 – Array Row by Row
The fourth variation uses a 2-dimensional VBA array to read the range row by row instead of cell by cell. The first dimension of this array has an upper bound of 1 (i.e. one row). The upper bound of the second dimension of this array is the defined number of columns. The code then reads and writes one entire row of the range instead of looping through it cell by cell.
Method 5 – Array Column by Column
This is the transposed version of method 4: it reads and writes the range column by column, using a 2-dimensional VBA array again, but this time with the rows count as the upper bound of the first dimension and 1 as the upper bound of the second dimension.
Method 6 – Entire Array in One Go
Finally, the fastest way to read/write all values from/to an Excel range is to directly assign the entire range to a 2-dimensional VBA array which dimensions equals the size of the range, i.e. the upper bound of the first dimension is the count of rows, the upper bound of the second dimension is the count of columns. Why is this approach the fastest? Because there is no looping necessary. Everything can be done in one single statement.
Performance Comparison
Let’s test the methods with different range sizes, i.e. combinations of rows and columns counts.
We start with a small range of only 10 rows and 2 columns. Here are the results:
 You can already see that using a Select statement is considerably slower than the other methods. However, as long as you are only dealing with very small cell ranges, the optimization potential is next to nothing.
Now, what if we increase rows to 5,000 and columns to 5, i.e. let the code read and write 25,000 cells?
 Boom! Simply deleting the totally useless Select statement already decreases the runtime of reading the range from 9.5 seconds down to 0.19 seconds and writing the values from 10.7 to 0.8 seconds. With the fastest method (#6), we even get to run times of only 3 respectively 61 milliseconds.
Now you see it: there is a considerable potential of performance optimization, if you use the best way to exchange data between Excel and VBA.
Finally, let’s go big: 50,000 rows and 50 columns (= 2.5 million cells):
 The effect scales. As we have seen before, the main performance killer is the Select statement. However, the results also show that simply using a range variable already massively speeds up the code of reading (5.8 instead of 17.8 seconds) and writing cells (49.4 instead of 68.9 seconds).
A further huge performance gain is possible with VBA arrays. In total, you can e.g. cut down the runtime of reading 2.5 million cells from 886 seconds (= almost 15 minutes) to less than one second.
Now, this is proof that you should definitely care about how you read data from and write data to a worksheet in VBA.
Please note that these results may vary depending on hardware, software, environment, other application or background tasks running, etc.
The Performance Test Tool
I conducted the tests shown above with a little Performance Test Tool.
The workbook consists of three worksheets.
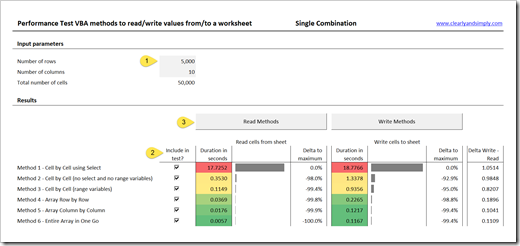
On the first worksheet [Performance Test Single], you can test one dedicated combination of rows and columns count:
- Define the desired count of rows and columns in cells C6 and C7
- Use the checkboxes to decide which methods shall be included in the test
- Press on the command buttons “Read Methods” and “Write Methods” to run the tests
- The results section of the dashboard shows the runtime in seconds (visualized in a one column heat map), the delta to the maximum duration in % and the difference between write and read for each method
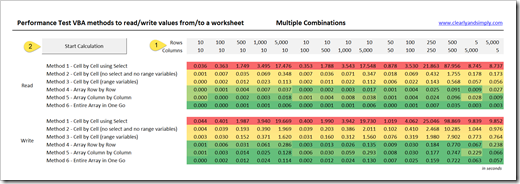
 On the second sheet [Performance Test] you can test 15 combinations of rows and columns count in one go.
- Define the rows and columns combinations in range D4:R5 (myParameters)
- Click on the Command Button “Start Calculations” to start the test
- The results (runtime in seconds) are then shown in two heat map tables
 The third worksheet [Input Output] is used as the input sheet for the read methods and the output sheet for the write methods. I.e. an internal worksheet, no changes necessary.
The Download Link
Here is the performance test tool for free download:
Download Read and Write VBA Performance Test
(zipped Microsoft Excel 2007-2016 workbook, 136K)
Please be advised that the code uses Windows functions (QueryPerformanceCounter and QueryPerformanceFrequency) to stop the time. Therefore the code will not work with Excel for Mac.
Stay tuned.
Leave a Reply