How to use the Microsoft Slider Control to implement a range filter input feature in Microsoft Excel
 Almost every Excel workbook needs some way of user interaction (maybe except for the Excel models serving solely as the reporting front-end of a database). The users changes parameters, sets filters, triggers actions and so forth.
The most common way of user interaction in Excel is directly typing in values in a cell. Form controls like scrollbars, spin buttons, radio buttons, combo boxes, etc. are the next step of more convenient interactivity. ActiveX controls provide more flexibility than form controls, but they come with there own disadvantages and usually form controls are the way to go.
However, there is one use case that cannot be covered with a standard Excel form control: selecting a range. Frequently required, especially for filtering data, e.g. a reporting period or products within a certain price range, etc.
Sure, you can define 2 input cells, 2 spin buttons or 2 scrollbars to let the user select a range.Though, there is no standard Excel form control to select a range within one single control.
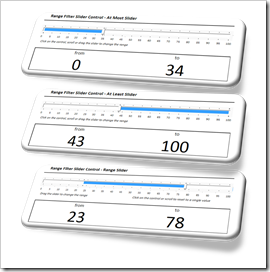
However, Microsoft provides a less known ActiveX control to select a range. Today’s article describes a how-to tutorial on using the Microsoft Slider Control in Microsoft Excel workbooks. As always, including the Excel workbook for free download.
The Challenge
The challenge of today’s post is very easy to describe: implement an interactive control on an Excel dashboard allowing the user to select a range of values with ease, i.e. within one control feature.
The Solution
1. The introduction – a single value slider
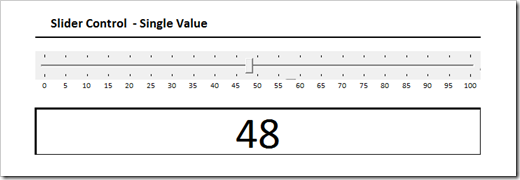
Agreed, using the Microsoft Slider Control for selecting only one value doesn’t make sense. A scrollbar or a spin button or – even better – a simple input cell to type in a value is more than enough. However, it is a good starting point to get used to the Slider Control. The control looks like this:
- click on the slider bar (called thumb), keep the mouse key pressed and drag the thumb to the desired position
- click right or left from the thumb to jump in larger steps (the change can be defined by setting the property .LargeChange, see below)
- use the scrolling wheel of your mouse
- use the keyboard (arrows, page up, page down, etc.)
2. The At Most Slider
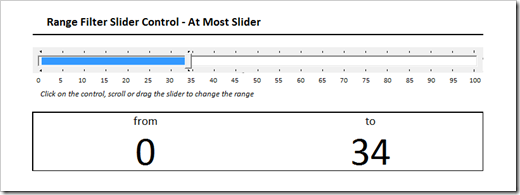
I think the name says it all. You can select a range from the defined minimum to any given value less or equal the defined maximum.
3. The At Least Slider
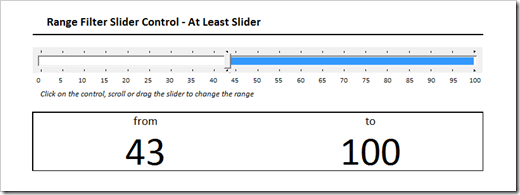
This is the counterpart of the At Most Slider:
4. The Range Slider
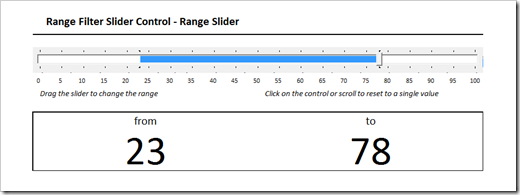
This is probably the most interesting way of using the Microsoft Slider Control. The first click on the thumb defines one end of the range. Releasing the mouse button sets the other end. Please be advised that this works in both directions, i.e. after the click, you can drag the thumb to the right or to the left:
Clicking again, using the mouse wheel or the keyboard deselects the range again.
5. The Range Slider requiring a pressed Shift Key
The range slider described above has one disadvantage: after deselecting the range by clicking somewhere else (or using the mouse wheel or the keyboard), it is very inconvenient to select the exact desired value for the next range selection. The only way to change the position of the thumb by the defined .SmallChange value is using the arrow keys. As I said, inconvenient.
Thus, I implemented an alternative way: selecting a range requires to keep the shift key pressed during the selection. After you released the shift key, you can drag the thumb in small changes by keeping the mouse key pressed. Furthermore, using the mouse wheel has more functionality: scrolling to the right will expand the existing range, scrolling to left (beyond the range start) will keep the size of the range and move it to the left.
To be honest, I am not sure which option is the better. It is like the choice between a rock and a hard stone. What do you think?
The Implementation
Part 1 – Insert the Slider and set the Properties
First, you need 4 simple steps to insert a Microsoft Slider Control into your workbook:
- Go to the developer tab, click on insert ActiveX Controls and the lower right symbol (the tools with the 3 dots, indicating More Controls)
- In the following dialog scroll down to Microsoft Slider Control and double click
- Insert the control on your worksheet, change to design mode, right click on the slider and choose Properties
- In the following window change the properties .Min, .Max, .SmallChange, .LargeChange and the .TickStyle (if you want to). Finally set .SelectRange to True (except for the single value slider).
Here are these four steps visualized in one picture:
Unlike Excel’s standard equivalent (the scrollbar), the Microsoft Slider Control does not have a .LinkedCell property. It only has the properties .Value (the actual position of the thumb), .SelStart (the start of the selected range) and .SelLength (the length of the selected range). We need some VBA to evaluate those properties and write them back to our worksheet.
1. The VBA of the Single Value Slider
This one is easy. We are using the event procedures _Click, _MouseMove and _Scroll and simply write the actual value of the thumb to a defined cell of the worksheet.
2. The VBA of the At Most Filter
We need some other event procedures for this one: _Click, _MouseDown, _MouseMove, _MouseUp and _Scroll. All event procedures have only one line, calling the following sub:
Private Sub SetAtMostSlider()
Slider22.SelStart = Slider22.Min
Slider22.SelLength = Slider22.Value
Range("myAtMostSliderValue").Value = Slider22.SelLength
End Sub
We set the start of the selection to the minimum of the slider defined in step 4 of part 1 (see above), SelLength to the actual value and then write the result to the worksheet.
3. The VBA of the At Least Filter
This is very much along the lines of the At Most Filter, just the other way round. The selection starts at the actual position of the thumb (i.e. the property .Value) and the length of the selection is the difference of the defined maximum and the start of the selection:
Private Sub SetAtLeastSlider()
Slider23.SelStart = Slider23.Value
Slider23.SelLength = Slider23.Max – Slider23.SelStart
Range("myAtLeastSliderValue").Value = Slider23.Value
End Sub
4. The VBA of the Range Filter
You guessed it: this one is a bit more complicated. However it requires still less than 50 lines of code.The basic idea are 2 module wide variables to manage the process of the range selection, i.e. the process between the clicking and the releasing of the mouse button. The main part of the VBA is the following sub:
Private Sub DefineRange(ByVal int_position1 As Integer, _
ByVal int_position2 As Integer)
If int_position1 <= int_position2 Then
Slider24.SelStart = int_position1
Slider24.SelLength = int_position2 – int_position1
Else
Slider24.SelStart = int_position2
Slider24.SelLength = int_position1 – int_position2
End If
End Sub
This sub manages the flexibility of the range selection, i.e. the option to select the begin or the end of the range and expand the range by moving the mouse. I won’t go into the details of the rest of the code here. If you are interested, have a look at the workbook provided for download below.
5. The VBA of the Range Filter requiring a pressed Shift Key
Besides a check for the shift key in the sub of the _MouseMoce event, especially the _Scroll event sub is more complicated:
Private Sub Slider25_Scroll()
If Slider25.SelLength <> 0 And (Slider25.Value <> Slider25.SelStart Or _
Slider25.Value <> Slider25.SelStart + Slider25.SelLength) Then
If Slider25.Value < Slider25.SelStart Then
Slider25.SelStart = Slider25.Value
Slider25.SelLength = _
Slider25.SelLength + Slider25.SelStart – Slider25.Value
ElseIf Slider25.Value > Slider25.SelStart + Slider25.SelLength Then
Slider25.SelLength = Slider25.Value – Slider25.SelStart
End If
Else
Slider25.SelStart = Slider25.Value
Slider25.SelLength = 0
End If
Range("mySliderShiftRangeStart").Value = Slider25.SelStart
Range("mySliderShiftRangeEnd").Value = _
Slider25.SelStart + Slider25.SelLength
End Sub
This sub expands the existing range if you scroll to the right (scroll up) and moves the existing range to the left if you scroll down and the thumb is smaller than the start of the selection.
That’s it. The workbook is available for free download (see below). If you are interested in more detail, please download the Excel file and dissect the code on your own. If you have any questions or suggestions, please leave me a comment.
The Downside
Using the Microsoft Slider Control is a nifty little option of improving the usability of your Excel dashboards. However, it comes with some considerable drawbacks:
- Time and effort
Compared to Excel’s form controls, the Microsoft Slider Control needs considerably more time for implementation.
- Limited format options
You can’t change much about the look and feel. E.g. as far as I know there is no way to change the color of the range bar to something else than blue.
- No scale labels
I haven’t found a way to label the tick marks of the scale. I went the hard way and built my own scale using textboxes. If you need something else than a scale from 0 to 100, you have to adapt these textboxes. Very inconvenient and time consuming.
- Compatibility issues
The last drawback in this list, but maybe the showstopper for the whole concept. The Slider Control is a native Windows feature and it should be available on every Windows computer with a Microsoft Office installation. However, it depends on the versions you are using. I developed the workbook using Microsoft Office 2010 and Windows 7 and it works like a charm on my machine. It definitely fails with Office 2003 and Windows XP. I don’t know if it works with Office 2007, I am not even sure that it will work with every Office 2010 implementation.
The Download Link
Here is the workbook including the discussed different types of range slider controls for free download:
Download Range Filter Slider Controls (Microsoft Excel 2010, 65.4K)
Acknowledgements
I have to admit, I stumbled across the Microsoft Slider Control just recently. A short Google search took me to Rod Stephen’s website VBHelper. I copied the code provided there (Select a range with the Slider control) and built the Excel workbook on this solid ground. Many thanks go to Rod Stephens for sharing his code.
What’s next?
This was the fifth article on Microsoft Excel in a row. I guess the time has come to publish something on Tableau again. The next article will provide a checklist of things you should take care of within your Tableau workbook before you can call it a day.
Stay tuned.
Update on Monday, April 11, 2011
Jeff pointed in a comment (see below) that the file provided for download is not working with Excel 2007. I still can't guarantee that this will be the case with your installation, but the following Excel 2003 file is working like a charm with Excel 2003 and Excel 2010 for me:
Download Range Filter Slider Controls (Microsoft Excel 2003, 320K)
If it still fails in your environment, try the following steps:
- delete the existing slider control on the worksheet
- insert the slider control again
- assign the correct name (e.g. Slider21)
- change the properties (Min, Max, SmallChange, LargeChange, TickStyle, SelectRange)
This should do the job.

Leave a Reply